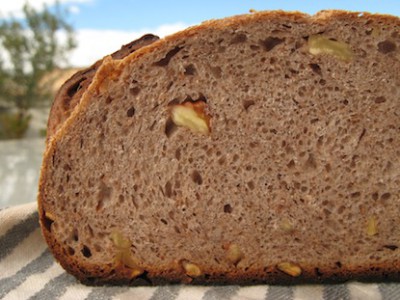
The way rye always gives the starter a big boost is really interesting, although the still-cold weather meant that it was Saturday night before I could feed it up again. I decided to go for Jeffrey Hamelman’s 40% caraway rye, without caraway seeds because my client doesn’t much like bits in her bread. Which is why she doesn’t get bread as often as I bake, but that’s another story.

I’m not going to repeat the recipe and method here because other than omitting the caraway seeds I didn’t do anything to make it my own. Normally I don’t add the little bit of yeast that Hamelman’s sourdough loaves often call for, but this time I did, partly in order to be able to bake it on Sunday night. Rye doughs, even at only 40%, are often sticky and so I tend to work it by smooshing it along the counter with one hand and using a scraper in the other to bring it back together.

In addition to omitting the caraway seeds, I also began building the rye starter with 150 gm rather than 20 gm. The idea was to have enough left-over starter to try something else: crispbread. For this I turned to Dark Crisp Rye Bread in Dan Lepard’s The Handmade Loaf, another favourite book. Again, I’m not going to copy out the recipe. I hadn’t made quite enough extra starter, so I ended up reducing quantities to 75% overall. Rolling out the dough proved not nearly as awkward as I expected, probably because I followed the instructions to dredge it with rye flour. I even managed to make the whole thing almost rectangular. I suspect that if I really got into this I might try harder for neatness in future, but not this first time.
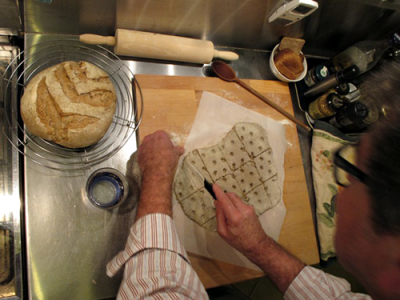
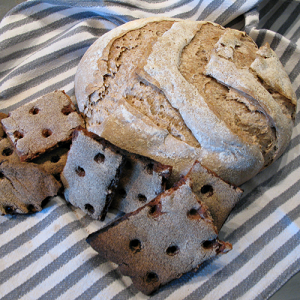
The loaf looked good coming out of the oven — I’ve developed a new scoring pattern that tends to elongate a round loaf, which I like — and the timing was perfect for the crispbread too. I’m not going to win any prizes for the regularity of my dimples, but they worked reasonably well, and after scoring the dough roughly into squares, into the oven it went “for 40-50 minutes, or until the upper surface is lightly tipped with golden patches against the grey rye crust”. And off I went, timer in hand, to do some other work, out of smelling range of the oven.

Big mistake.

Forty minutes later the oven greeted me with an acrid smell and even some smoke. The bread was charred, rather than merely crisp. It seemed so bad, I really was wondering whether there was a mistake in either the temperature or the time. Seems like I wasn’t the only one.

I’m adding in a comment about the Dark crisp rye bread as well (p. 167). I was very excited to try this as we love knackerbrod. Despite my initial misgivings about the temperature and the bake time (425 F for 40 – 50 minutes), knowing that the light rye flatbreads were a mere 400 F for all of 25 – 30 minutes, I went ahead and followed the instructions to the letter, as I usually do the first time around. What a mistake. 30 minutes into the process, the bread was burnt to a crisp. It was black in several places. Now as I mentioned I’ve had my oven re-calibrated twice and I do not have this problem with other books. So if you do buy the version out right now, go ahead and lower the temperature and bake time on that recipe, and don’t be afraid to tweak things ahead of time if they look a little off.

That’s actually strangely reassuring. I am not alone. In the end, the flavour of these crispbreads was rather good, making allowances for the bitterness of the burnt bits, and I will definitely be trying them again.
Whether that will be before the next entirely unpredictable Pasta Madre Day rolls around, I cannot say. And in its own strange way, the very unpredictability of Pasta Madre Day (there seems to have been one in December 2011, but no indication of whether it is annual, but roves around, like Easter, or happens only when people remember to do it) is at odds with baking with a natural leaven. You can’t just suddenly decide to make a sourdough loaf. You need to have a starter, and you need to feed it up before you begin to make your dough. Unless, of course, you keep a large amount fed all the time just in case, which strikes me as incredibly wasteful. So I’m confused. I didn’t need Pasta Madre Day to bless my baking. But I rather like the idea of my baking helping to contribute to a wider appreciation of the joy and satisfaction to be had from baking with natural leavens.

Maybe next time I (and Pasta Madre Day) will be better prepared.
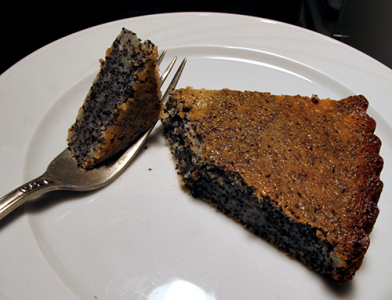
The image of fine Victorian ladies lounging around in a slight stupor after eating too much poppyseed cake has always tickled me, notwithstanding that some of them were surely on laudanum and had no need of cake. Not so funny the idea that you can be busted after eating a single poppyseed bagel or slice of poppyseed cake. At the very least, you can fail a drug test and have to fight to have that overturned.

Ingredients

2 eggs

150 gm white sugar

1 tsp vanilla extract

125 ml oil (peanut, sunflower, whatever)

250 ml plain yoghurt

130 gm poppyseeds

70 gm plain white flour

1 tsp baking powder

Method

Preheat the oven to 180° C (about Gas 5-6). Butter a round pie or cake tin, about 25 cm diameter.

Beat the eggs, sugar, vanilla and oil well together. Add the yoghurt and poppyseeds and beat them in too. Add the flour and baking powder and stir well to incorporate, ensuring there are no lumps of flour. Pour into the tin, place in the middle of the preheated oven and bake for 40 minutes. Turn it around after 20 minutes to even exposure to heat in the oven. Test that a skewer or toothpick comes out clean, remove from the oven and allow to cool in the tin.

My Mum’s recipe says to garnish with jam and chocolate, but she wouldn’t do that and neither would I. Serve with more yoghurt, mascarpone, or even plain whipped cream. Or without any garnish. A lemon drizzle could be good, but most of the ones I’ve seen out there look too sugary. There must be a lemon drizzle that isn’t just lemon-flavoured icing sugar.

I’d eat a slice every day, especially if I were in a job that subjected me to random drug tests.

Roscioli in Rome (the bakery, around the corner from the deli/restaurant) does a dark, almost burnt walnut loaf that many people swear by. A couple of years ago I tried to imagine a recipe. It wasn’t good. Then I found a link to an old recipe of Dan Lepard’s in The Independent. I just searched for the link, but it seems to be broken. No matter, though, because I did a full work-up — with pictorial goodness — on my other blog . The secret is the walnut paste in the dough. It gives a flavour boost and imparts a lovely purple colour to the loaf.

I’ve modified the recipe since then, going to a pure sourdough, no commercial yeast. Why? Because I can; nothing purist about it. Here are the details.

For the dough:

100 gm walnut paste (see below)
300 gm active starter at 100% hydration
125 gm water
200 gm strong white flour
100 gm wholemeal flour
50 gm rye flour
10 gm salt
50 gm honey
100 gm walnuts
Oil for kneading

For the walnut paste:

40 gm walnuts
20 gm soft butter
40 gm water
A pinch of salt

First make the paste. Put 40 gm of walnuts, water, butter and salt into a food processor and whizz until you have a soft, smooth paste.

Mix the water into starter (you did make enough to keep some for next time?), add the honey and mix to incorporate roughly. Now add the walnut paste, the flours and the salt and mix well until you have a shaggy mass of dough. Tip in the remaining 100 gm of walnuts and squidge them into the dough. Cover the bowl and leave to rest for 10 minutes or so.

Tip the dough out onto a lightly oiled surface and knead it quickly about 10 times. The faster you work, the less likely it is to stick to the surface and your hands. Return the dough to the bowl, cover, and leave for about an hour. Knead again 10 times quickly. You should notice a definite improvement in the structure, more elastic and less sticky. Return to the bowl, cover, and leave another hour or so.

Prepare your container, a banneton or a tea-towel in a deep bowl, well floured. Knead the dough once more and then shape and place the shaped loaf in the container to rise. This final proofing normally takes about two hours under my conditions.

Preheat the oven to 210℃ (410℉). Turn the loaf out and score a checkerboard pattern on the top with vertical cuts. Pop the loaf in the oven and bake “for about an hour or until the loaf is rich brown and, when tapped, sounds hollow”. Allow to cool on a rack.

One more thing; it makes great toast. If you don’t eat it all fresh. Seriously, this is a great bread. I should add that, glutton for punishment that I am, I have only ever made this bread with freshly shelled walnuts. I’ll bet it is every bit as good with ready-shelled ones, but I wouldn’t wait too long in the season because walnuts can go a bit rancid.

The slightly bitter taste of chestnut flour — along with the nuttiness — makes for an interesting loaf, but some of the recipes I’ve seen, with 50% chestnut flour or more, are a bit too heavy for my taste. I tried a couple at lower levels, around 10%, and they weren’t chestnutty enough. So eventually I settled on 20% chestnut flour. I’ve also taken to adding a little wholemeal (10%) to almost all my bread recipes as it seems to add so much depth of flavour. This is enough for two large loaves.

Ingredients:

740 gm active starter at 100% hydration
250 gm, chestnut flour (20%)
125 gm wholemeal flour (10%)
495 gm strong white flour (70%, with the 370 gm flour in the starter)
18 gm salt
440 gm water (65%, with the 370 gm water in the starter)

In a large bowl, add the water to the starter and mix roughly. Mix in the white flour and allow to rest for 10 minutes. Now add the salt, the chestnut flour and the wholemeal flour and mix well. Tip out onto a lightly oiled surface and knead to incorporate all the ingredients. Return to the bowl, cover, and leave for an hour.

Tip out the dough, knead quickly about 20 times and return to the bowl for a further hour. Knead once again and allow to rise again for an hour. The total bulk ferment is thus about three hours.

Prepare two or three containers; I used two well-floured bannetons, but the dough is firm enough that you can also make three longer loaves and do the final rise on a well-floured couche. Shape the dough, place in the containers, and allow to rise. I put them in the fridge, inside plastic bags, overnight.

Pre-heat the oven to 220°C (430°F), slash the loaves and bake for 25 minutes (20 minutes if you make smaller loaves). Turn the oven down to 205°C (400°F), rotate the loaves, and bake for a further 25 minutes. Cool on a wire rack.

The bread keeps well, and is very good with savoury things like salami.

Alfie Venner spent the days before Christmas helping his parents with their wood-fired, sourdough-leavened bakery in Somerset. Part of his recollections :

On my breaks from mixing, stretching and shaping dough with the head baker, I helped mum weighing out the dried fruit for German Stollen bread and rolling out the 100g pieces of marzipan that get carefully rolled into the centre of each loaf. The rich dough that mum makes bears little resemblance to the first Stollen made in 13th Century Saxony from oil, flour, yeast and water. We have Pope Innocent VIII to thank for that; in 1490 he sent what has become known as the ‘butter letter’ to the Saxon Prince allowing the Saxons to use butter during Lent.

That seemed odd. Stollen is (and always has been?) a Christmas bread, so what’s Lent got to do with it? A little sleuthing turned up an article on Wikipedia that had some details. Advent was a fast period, just like Lent, and after a couple of rebuffs and five papal successions Pope Innocent VIII finally permitted the Prince-Elector of Saxony and his household to use butter, and the stollen we know and love was born.

Wikipedia says that the oil that went into stollen before the butter-letter was “expensive, hard to come by, and had to be made from turnips”. I suppose that it was an oil pressed from turnip seeds, or some other Brassica, but as Wikipedians are so fond of saying, “citation needed”. The online history of stollen leaves a lot to be desired. Are there any better sources?